Measurement of the bulk density of materials by X-ray absorption
X-ray absorption technology allows us to determine the distribution of bulk density inside materials, in a non-destructive, non-health-harming and environmentally friendly way. For this reason, it is widely used in a large number of industrial sectors for quality control of processed products, in search of macroscopic discontinuities and defects in its internal structure.
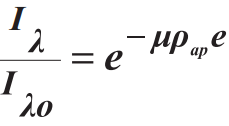
The measurement of bulk density by X-ray absorption is based on the so-called Lambert-Beer absorption law, according to which, when electromagnetic radiation passes through a given material medium, the fraction of incident radiation that is absorbed by the material depends exclusively on its chemical nature, its thickness and its bulk density. The following equation represents the Lambert-Beer law applied to monochromatic radiation and to a perfectly homogeneous material medium throughout:

being Iλ the intensity of the incident radiation, Iλo the intensity of the transmitted radiation, e the thickness of the material, ρ the bulk density, and μ the X-ray absorption coefficient of the material.
The absorption coefficient μ depends on the chemical composition of the material, for a given voltage and electric current intensity of the X-ray tube, and can be calculated from the chemical analysis of the material and the knowledge of the atomic absorption coefficient of each element.
Case Study: The Use of X-ray Absorption for Compaction Control of Pressed Ceramic Parts
The Need to Measure the Density of Pressed Parts
The value and distribution of porosity in compacted ceramic substrates determines, to a large extent, the properties of the final product (dimensions, curvature, frost resistance, mechanical strength, presence of black core, surface finish, etc.). This fact makes it essential to carry out an exhaustive control of the porosity of the supports during their forming, in order to ensure the proper development of the rest of the process and maintain the properties of the final product within the pre-established margins of variation, so that the percentage of production losses, or production that is not of top quality, is as low as possible, and therefore the profitability of the factory is as high as possible.
Given the difficulty of making direct measurements of the porosity of ceramic pieces, in industrial practice, the physical magnitude that is really controlled is the bulk density of the raw supports. Traditionally, methodologies other than X-ray absorption have been used to carry out these measurements in an industrial plant, such as the mercury immersion method, or the reproduction of the volume by laser or vacuum membranes, and subsequent weighing. Systems that employ these methodologies require the pre-cutting of freshly pressed substrates into small blocks of approximately 40 x 40 mm. This operation is laborious and slow, and it can take an operator between 50 and 60 minutes to obtain a representative measurement of all the parts formed in a press stroke. In addition, the information obtained is partial, since in order to avoid an even longer testing time, the entire part is not measured, but a number of blocks as small as possible without detracting from the representativeness of the part.
The application for measuring density with X-rays
In 2014, the use of X-ray absorption technology began in industrial plants for the control of compaction in industrial parts, thanks to an equipment development based on several patents of the Institute of Ceramic Technology of Castellón (ITC-AICE). The use of X-rays in this area has made it possible to take a big step forward in this process, because, in just a few minutes, it is possible to measure 100% of the surface of the part, with more than 1,000 measurement points per square centimeter and reducing the test time by up to 90%.
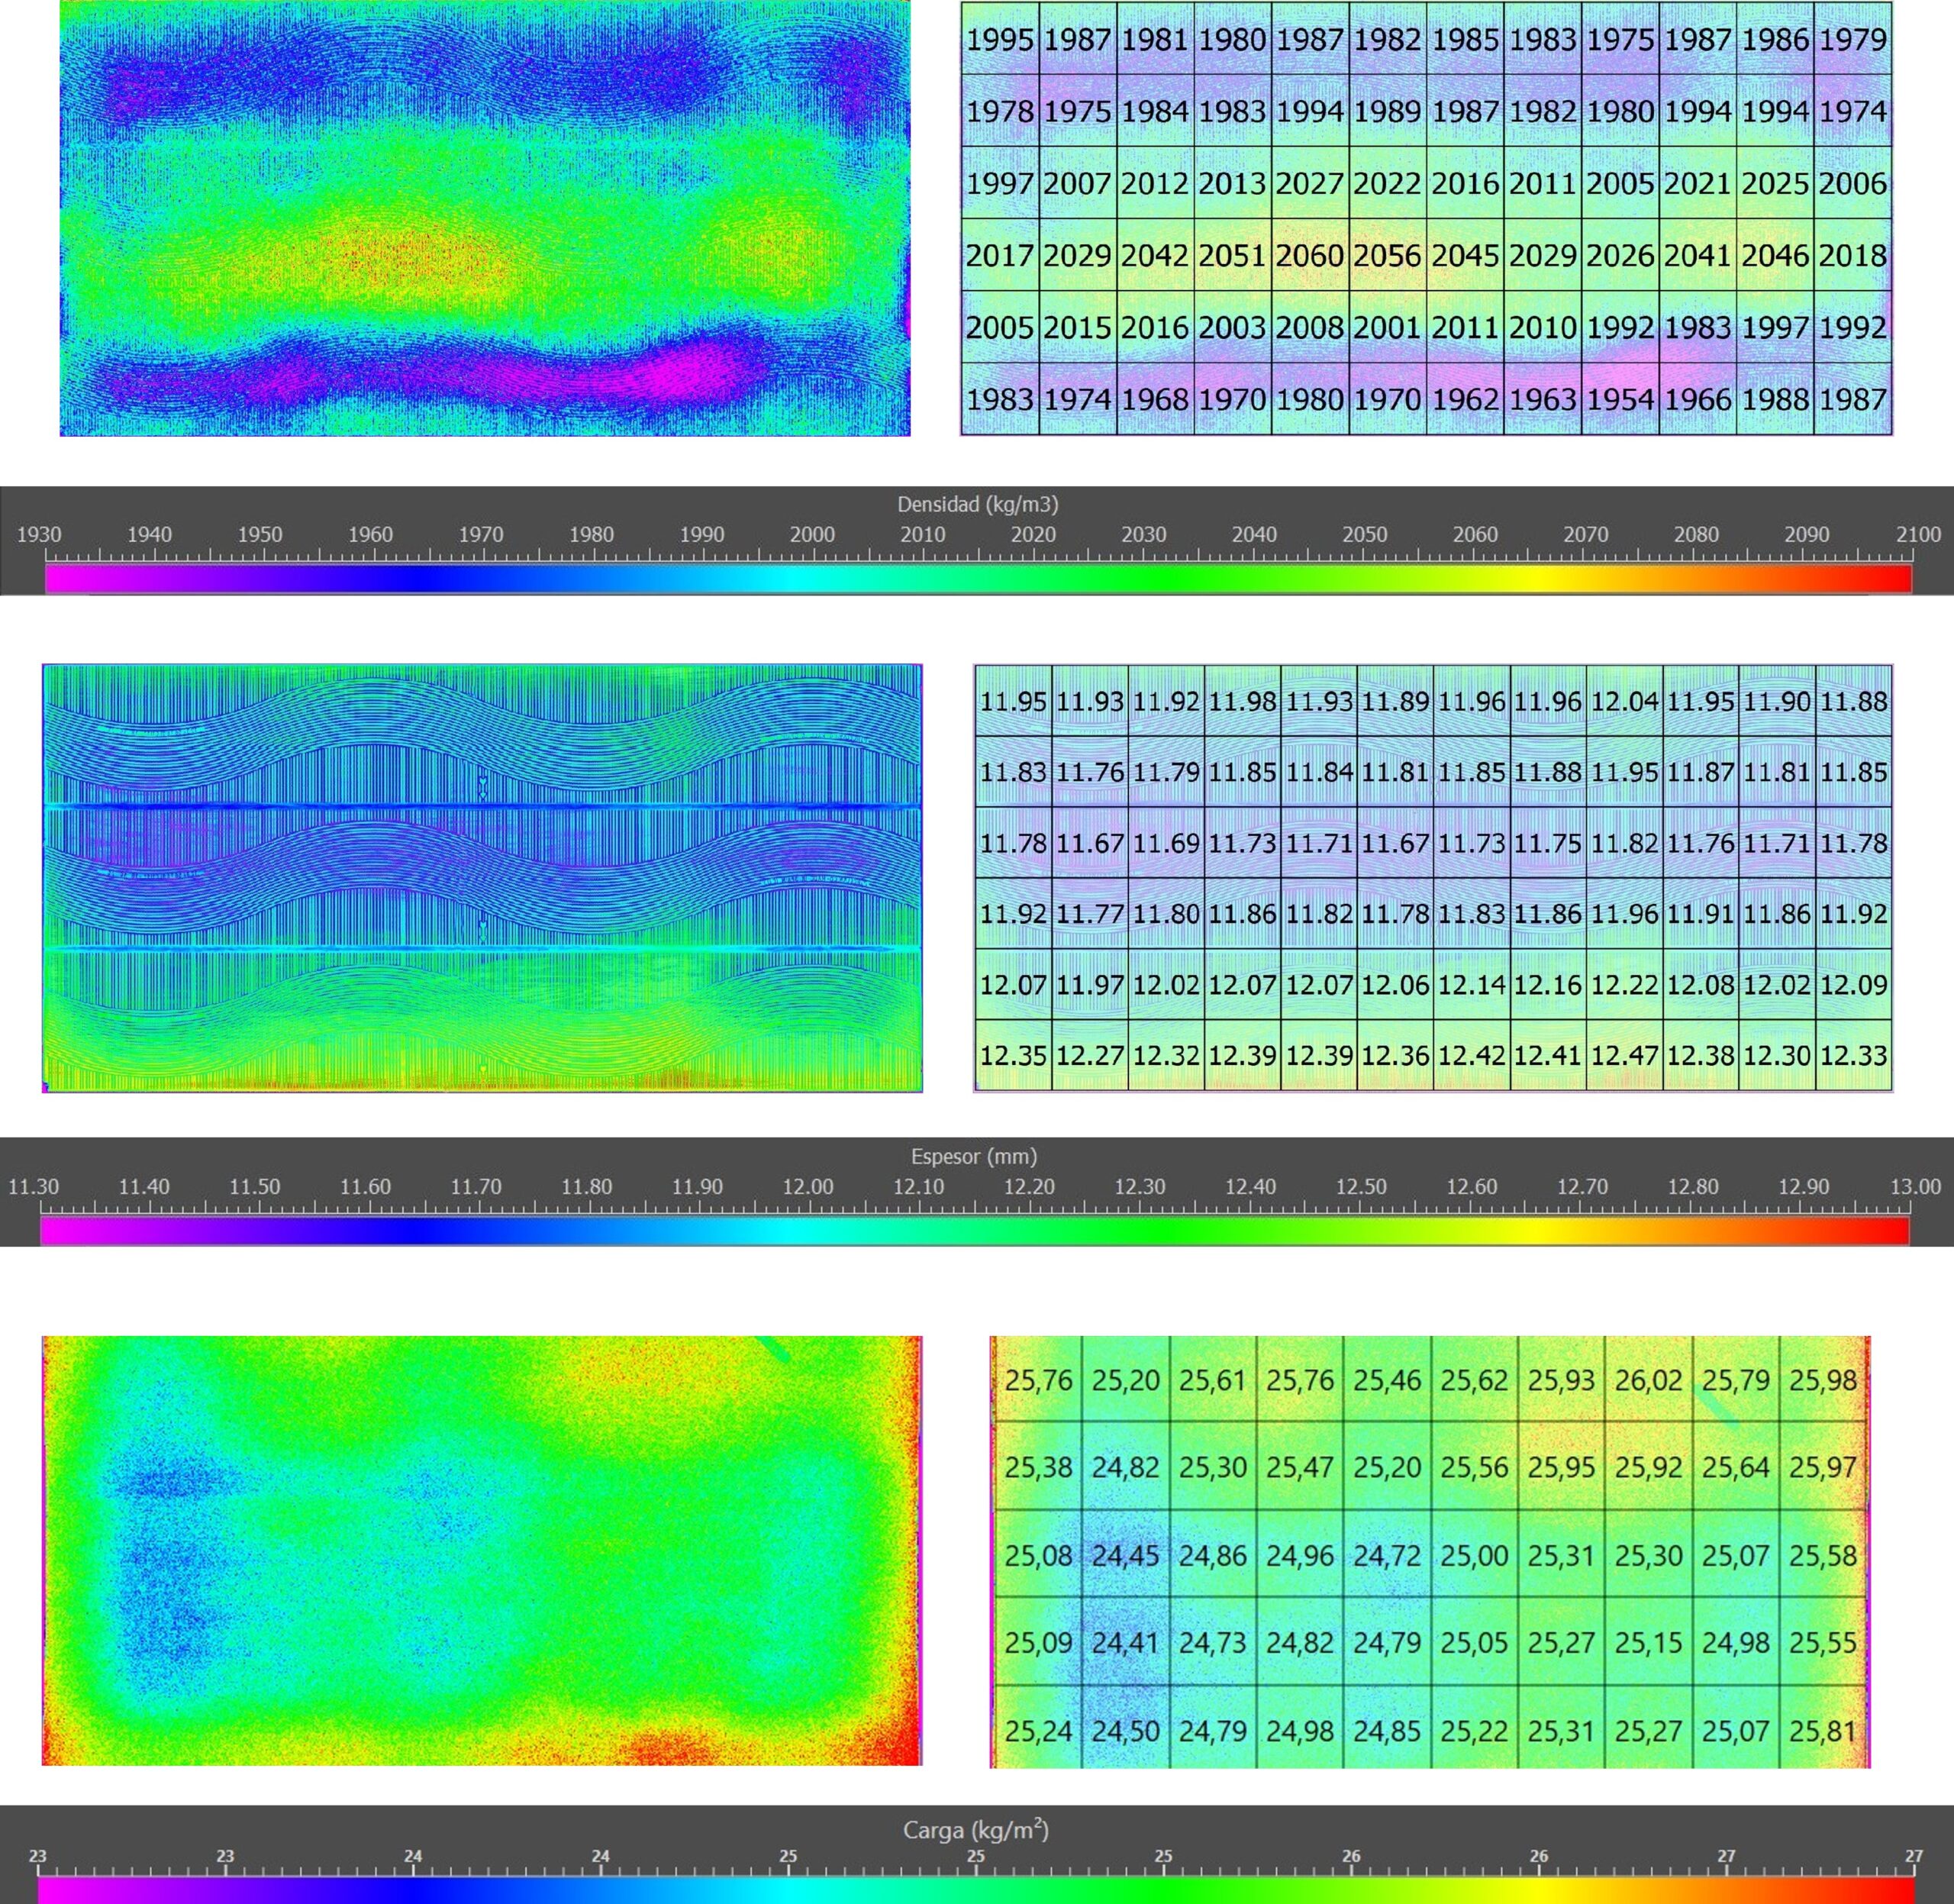
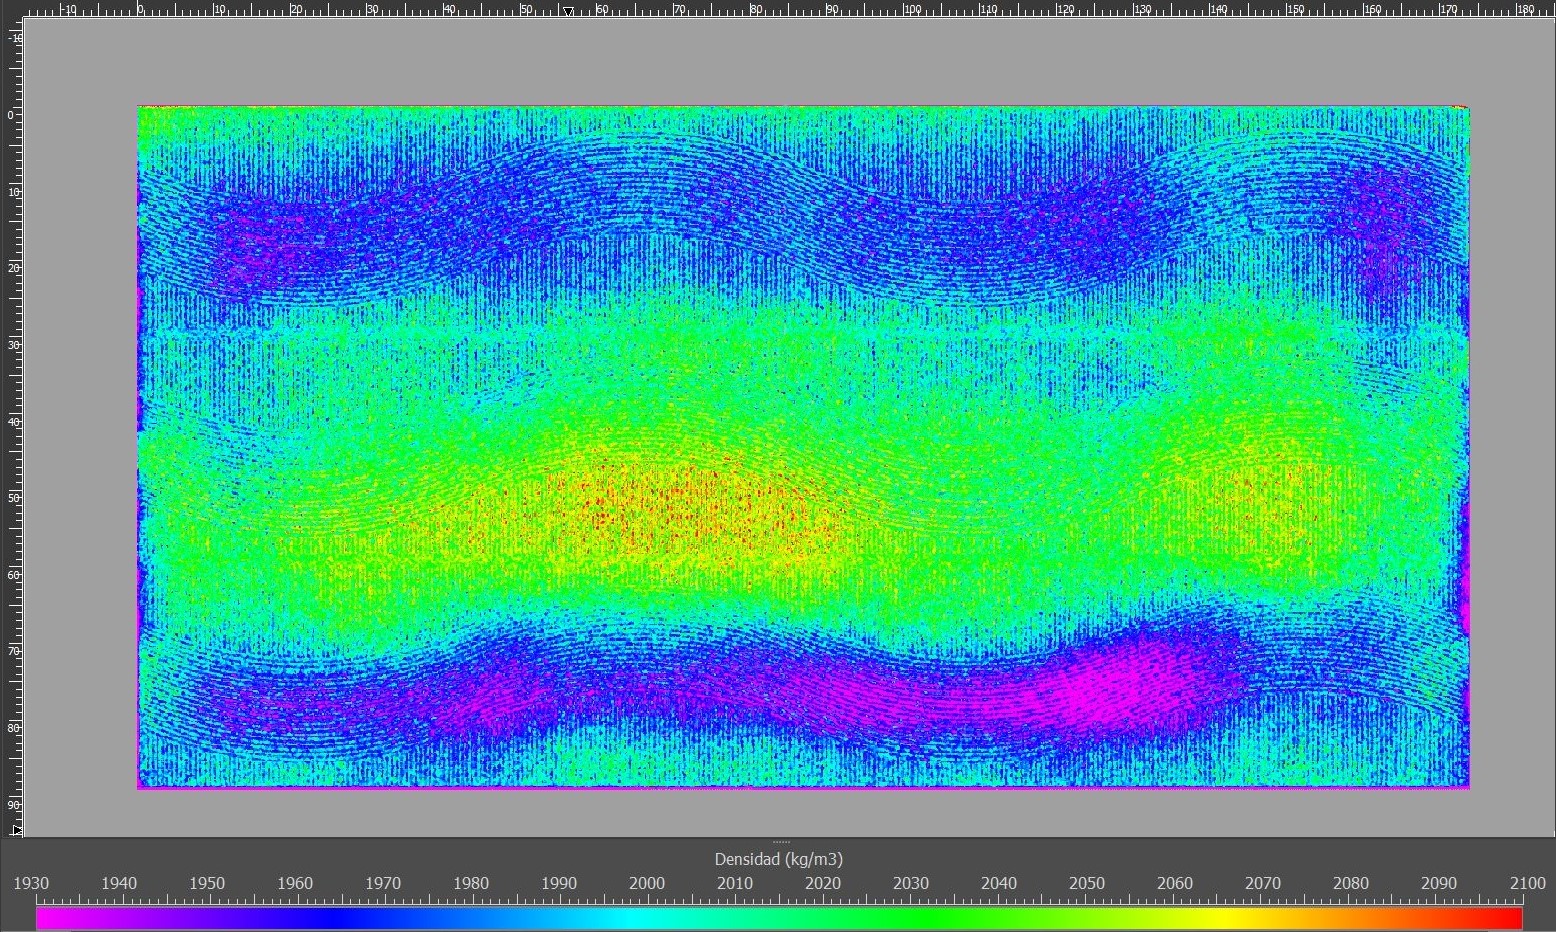
The results of this type of test are three 2D maps, each of them representative of the bulk density distribution (kg/m3), thickness (mm) and load (kg/m2) of the inspected part. For each of the maps, you can represent mean values for the desired grid size, as well as mean values by rows and columns.

Figure 1. Complete bulk density distribution, thickness and load of a 60×120 cm part (test time: 4 min).
According to the design of the measuring equipment, the piece to be measured is placed on a belt that transports it to the measuring area in a discontinuous way, step by step. In turn, an X-ray emitting tube travels transversely on the part, scanning it from left to right and vice versa. On the other side of the emitter tube is a radiation sensor, which measures the amount of radiation passing through the part. A laser telemetry system also accompanies the tube by performing the thickness measurement.

Figure 2. Profile of X-ray Absorption Measurement and Laser Telemetry Equipment
To ensure the correct operation of the equipment, as well as the precision in the measurement, the equipment is located in an air-conditioned room isolated from the suspended dust in the press section. Technicians sample pressed parts and transport them to the measuring room for inspection.
In addition to the raw piece measurement, it is also possible to measure the fired piece. The possibility of characterizing the same pieces, before and after firing, makes it possible to discern whether a certain defect is due to an incorrect development of the pressing operation or, on the contrary, appears as a consequence of a non-optimized oven regulation. X-ray monitoring in the firing process also provides a quick, albeit indirect, way to check whether the water absorption in the ceramic piece remains constant.
Advantages of Using X-ray Technology in Quality Control of Ceramic Tile Manufacturing
Thanks to the use of X-rays in the pressing stage for compaction measurement, the technician has a large amount of information in a very short time. These variables, for any production process (information and time), are key to being able to have greater control and certainty over manufacturing. It is especially important to verify in the initial stages, such as the shaping of the piece, since, as we have seen, a good compaction depends on the fact that problems related to enamelling, decoration or firing do not appear later.
With the density, thickness and mass distribution maps obtained, the technician quickly learns how to adjust the pressing variables, and how these adjustments affect changes in the part, anticipating in an agile and effective way the correction of future failures in production. These advantages allow the factory to reduce its percentage of waste, and to increase the percentage of first quality, which is ultimately a significant economic benefit at the end of the year.
The use of this technology is consolidated and validated in ceramic tile manufacturing companies, with more than 45 active equipment in different producing customers around the world. There is no doubt that, due to the great advantages it is bringing, over time the X-ray absorption method will be extended more and more in the sector worldwide.
